Intro
Below you'll find the basics of how to get started with the Absolut HubSpot theme. Once you click the Install button in the HubSpot marketplace, you will arrive at a confirmation screen, and after a few minutes (it can take up to 5 minutes for the theme installation to be completed), you should be able to find your new theme among other themes in several places inside HubSpot:
-
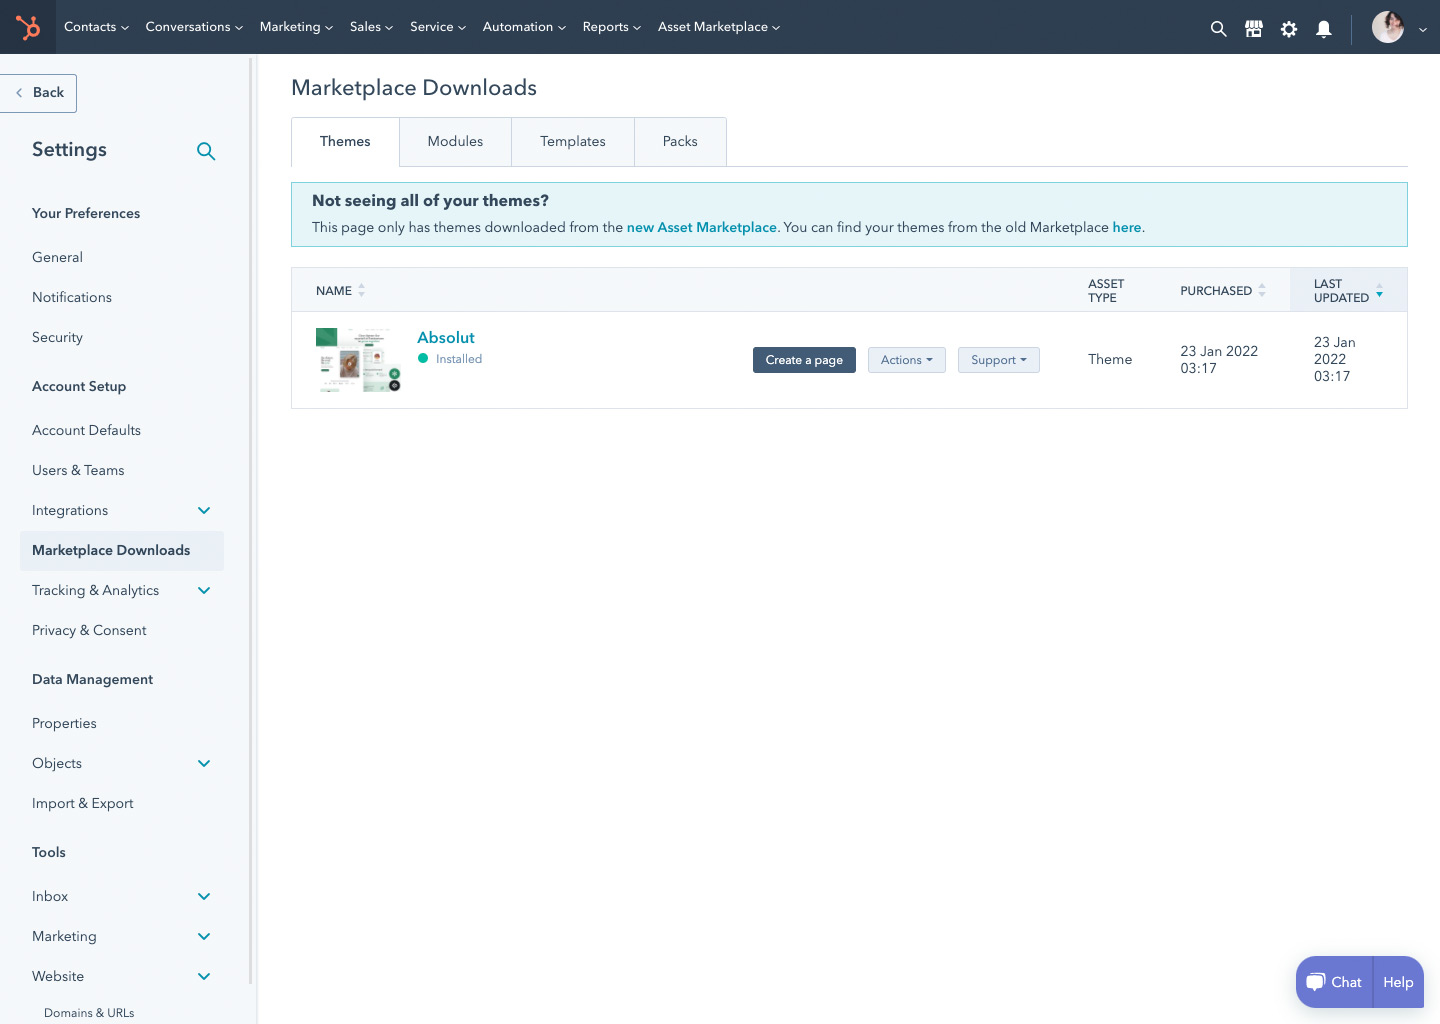
Settings > Account Setup > Marketplace Downloads
-
Settings > Tools > Website > Themes

-
Marketing > Files and Templates > Design Tools

→ Reinstall Theme
In rare cases, due to a common bug on the HubSpot marketplace, your theme may not arrive successfully to your account.
If this happens to you, no worries, you just need to go to Settings > Account Setup > Marketplace Downloads, and then select Absolut HubSpot theme, click Actions, and then Uninstall.

It will take a few minutes, and after that, you need to click Actions again, and then Reinstall.

This will fix any issues that could have occurred. While this is a very unusual issue, in case it happens to you, the solution is simple and easy.
→ Create Child Theme
Once your new HubSpot theme is ready, consider an option to create a child theme before making any changes to the theme or building pages with it.
While this is not a required step,
it is highly suggested.
This is so you always have a clean backup in case you end up modifying any parts of the theme, and want to go back to the original version. Also, it’s a great option in case you create another HubSpot website in the future, so you have a clean version of Absolut HubSpot theme ready for it.
In order to do it, go through the steps below:
- In your HubSpot account, navigate to Marketing > Files and Templates > Design Tools.
- In the finder, click the @marketplace folder.
- Right click a theme folder, then select Create child theme.
- In the dialog box, enter a name for the child theme.
- To change where the child theme will be saved, click Change in the File location section. Click a folder, then click Select.
- To customize the names of the theme's CSS and JS files, click Advanced options, then enter new file names in the CSS and JS fields.
-
To finish the process, click Create child theme.

From this point on, please just ensure that if you make changes to the theme, always do them on the cloned version.
→ Create New Page
Once the Absolut HubSpot theme is in your HubSpot account, it’s ready to be applied to your website pages. To create a new page with the Absolut HubSpot theme follow the instructions below:
- Go to Marketing > Website > Website Pages.
- Click Create > Website page button in the top right area of the HubSpot CMS. This will show you the Choose a Theme screen.
- Pick Absolut HubSpot theme or its child theme if you created such among other themes you may have.
- Choose a page template next. For example, Absolut | Banner homepage and name it. The name given at this stage is only for internal use inside HubSpot CMS and it doesn't affect webpage URL etc.
To make it easier to navigate through all themes and templates you may have, we've added the Absolut symbol to each preview. So any Absolut-related template can be detected in seconds. To make the story short, follow this pic in the top right corner of the thumbnail:

→ Apply Theme to Existing Page
It's possible to apply Absolut HubSpot theme to the current pages inside HubSpot CMS. In order to do this, go through the steps below:
- Navigate to Marketing > Website pages.
- Open a page you have. If it is published, on a new screen click on the Edit button in the right area of the page. If it's unpublished Content Editor will be available right after the page is open.
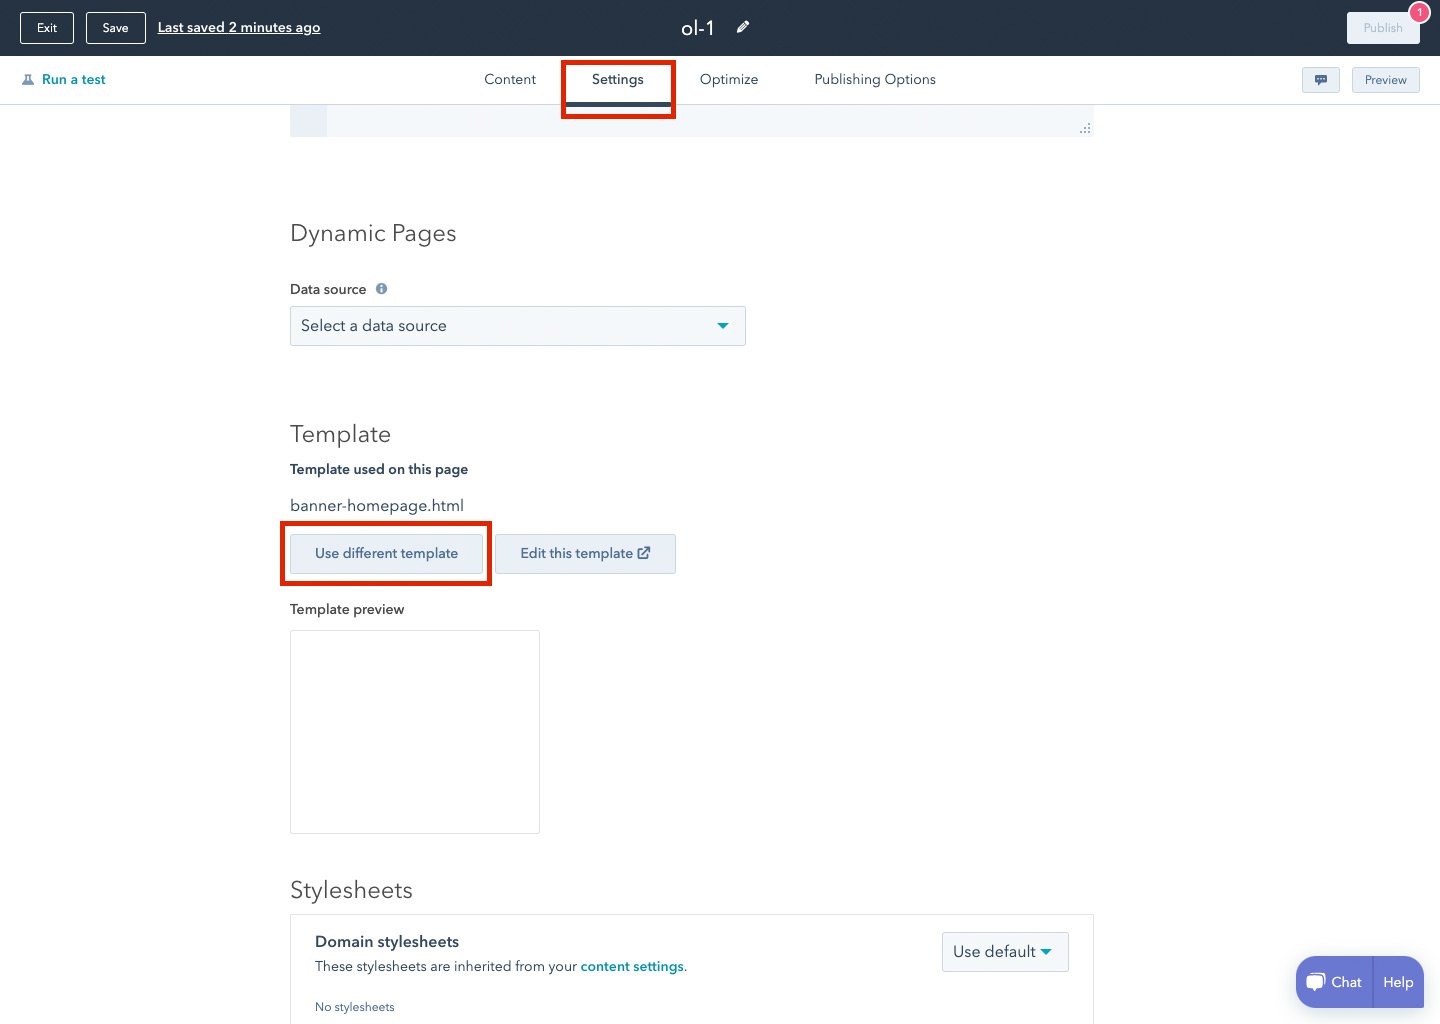
- Go to the Settings tab and scroll down its content.
- Open Advanced Options and scroll down to the Template section of it.
-
Click Use Different Template and you'll be redirected to screens to choose themes & templates similar to how to create a new page.
→ Intro: FAQ
Will my website get affected if I purchase/install the Absolut theme?
No. Purchasing the Absolut HubSpot theme will only install the theme files on your HubSpot account, however, it won’t affect in any way your current website.
Once you purchase it, you will be able to start creating page by page using your new theme, and you will be able to push it live whenever you are ready, so there is nothing to worry about.
Can I use Absolut HubSpot Theme for more than one site?
The Absolut license lets you use the Absolut HubSpot Theme on as many sites as you want, within the same company or project.
This means that if your company has 5 websites, you can use the Absolut theme on all of them, as it’s already included in your license.
However, if you are creating websites for other companies (if you are an agency or a freelancer), you should ask your client to install the theme so they can have it licensed to receive updates.
Customization
There are various options for how the Absolut theme can be customized, starting with global settings and going to specific modules.
Global settings are located in the Design section of the Content Editor. Here's how to find it:
- Open any of your pages based on the Absolut HubSpot theme.
- Once you're inside Content Editor, go to the Design tab in the left pane.
- Click Edit Theme Settings, and you will be redirected to the Theme settings screen. Here, you will have access to all global design customization settings of the Absolut HubSpot theme.
Theme Settings consist of 6 main sections:
- Global colors
- Global fonts
- Layout
- Typography
- Buttons
- Forms
- Header
- Performance
Options presented here are applied directly to the corresponding elements of the theme. At the same time, they impact many others automatically via CSS and hubl to ensure visual consistency of the website built upon the Absolut HubSpot theme. For example, base font size influences the margins and paddings throughout the theme templates.
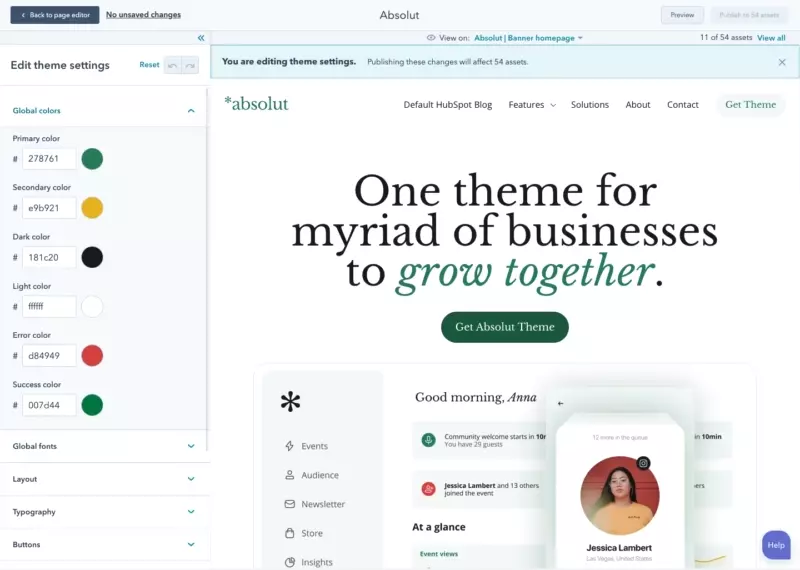
→ Global Colors
Global Colors settings allow you to edit 6 main color options of the theme:
- Primary
- Secondary
- Dark
- Light
- Success
- Error
The most crucial here is Primary color value. Changing it automatically recalculates lots of other elements styling. For example, hover color for buttons, form fields backgrounds, some section backgrounds.
It's important to remember that the Absolut HubSpot theme uses up to 4 tints and 4 shades of the primary color as well as the other five colors. Changing them means you're automatically changing styling elements in different places of the theme.
Success and Error color values are used for notifications when the system is talking to the user. For example, when the form has been sent or comment left. So be cautious editing those ones.
Once you finish updating the colors, just click Publish.
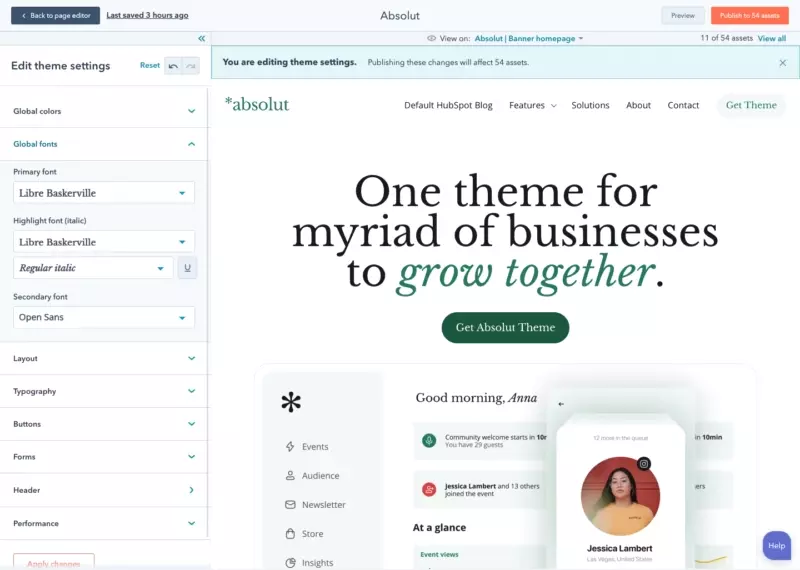
→ Global Fonts
Global fonts section consists of three main fonts — primary, highlight, and secondary.
Primary font is used mainly for headings, like H1…H6, in the theme. Secondary font is used mostly for paragraphs and body texts. However, both headings and body text can be overridden in the Typography section below.
Global fonts works as global settings that impacts all elements in the theme. It is best to specify your brand fonts here. Here you can pick any of Google Fonts without any extra work, click Apply changes, and that's it.
→ Layout
Layout section defines containers width, global corner radius, and page transition.
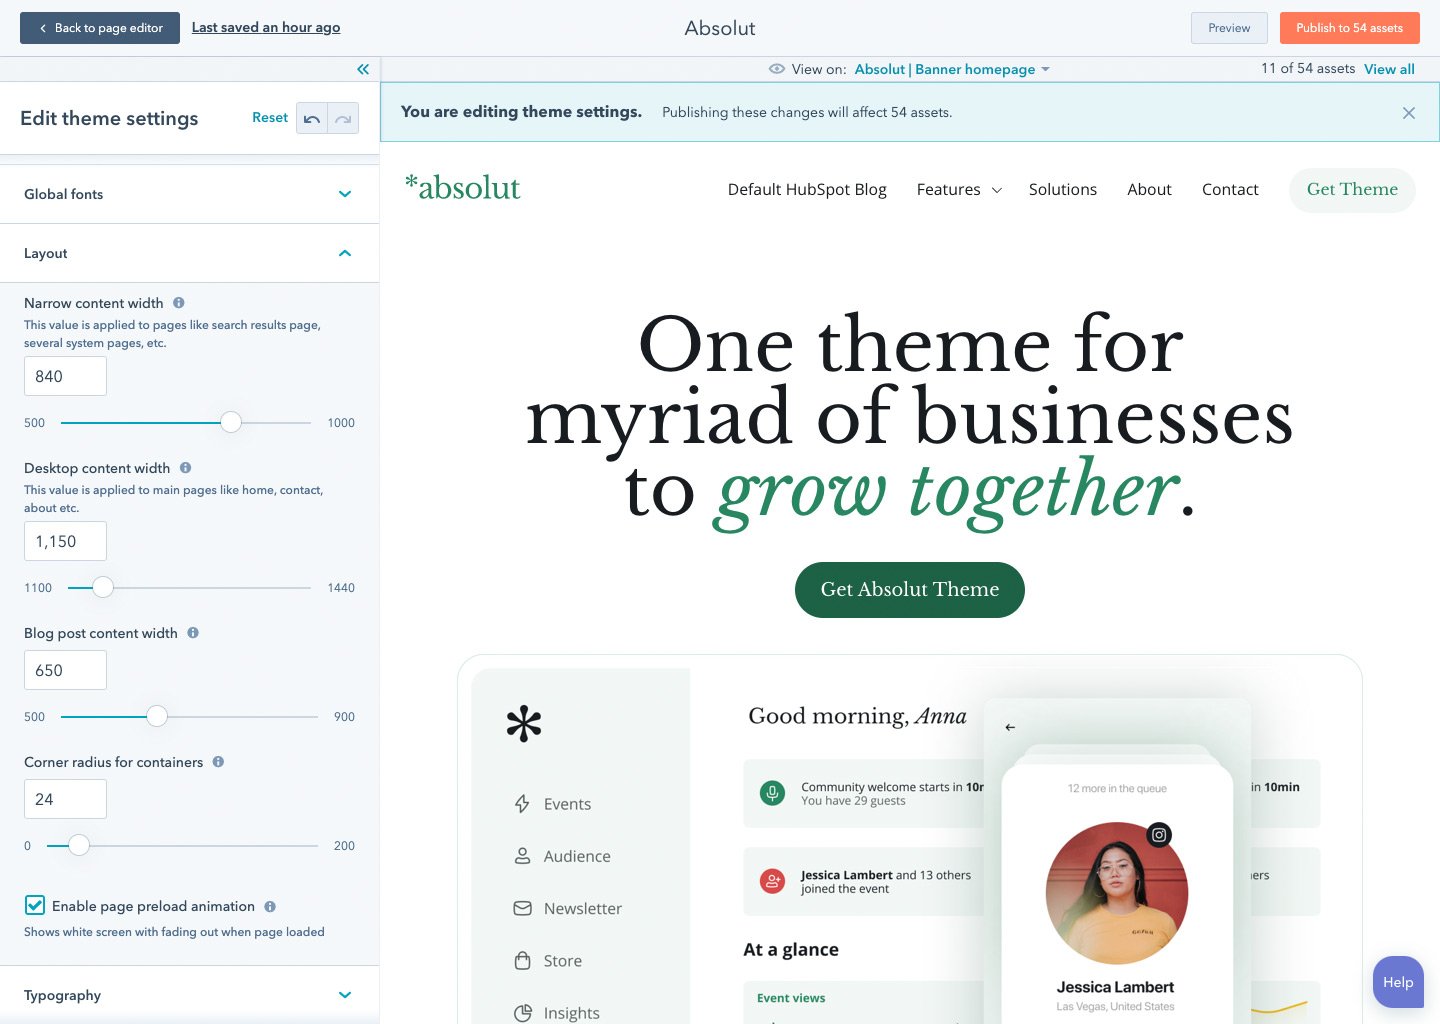
Three main containers are the default container, system page container, and blog post container.
To change the default container width, edit the Desktop content width slider in Layout settings. It's important to remember that this value can be redefined for a specific page or a section of the page while editing that page directly.
Narrow content width value affects most system pages such as search results, password prompt, etc.
Blog post content width allows controlling the reading experience of your blog. In case you change the font size for the main content, it's good to adjust the width of the blog post container as well. So it keeps recommended number of characters per line of text.
All these parameters above help keep the website's design consistent as well as the corner radius option. It applies to various modules and containers throughout the theme. So it is a global setting. If you'd like to change its value for particular elements it can be done at a page level.
It's important to remember that all the numeric values in this section are in pixels.
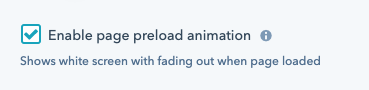
At the bottom of this section, you'll see the checkbox that enables page preload animation, which is a white fadeout, to smooth transition from page to page.
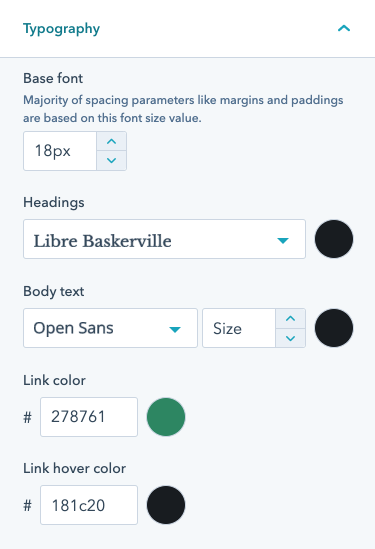
→ Typography
When it comes to typography settings, base font is a key value. The majority of parameters in the theme are based on its value — paragraphs and headings, margins and paddings, etc. This connection ensures consistency of the overall design.
Changing base font size means all other typographic values will be recalculated automatically based on the relative values defined in the code. However, you can define paragraph size separately here by changing body text size.
Another important design parameter is links. Here, you can define its color and the color for a hover state.
In case you'd like a bit darker shade of a link color for hover, just clear the Link hover color input field and click Apply changes. The theme will generate a hover color based on the link color automatically.
→ Buttons
Once you are done with updating the typography, let’s change your theme buttons.
There are three available parameters to change — corner radius, fill color, and label color. These settings impact the way how button types are going to look like.
Primary, Secondary, and Simple are those button types.
By default, Primary button takes the fill color specified in theme settings as background. Secondary button takes a darker shade of fill color for the label and a lighter tint for the background. Simple looks like a label without a background but with an arrow preceding label.
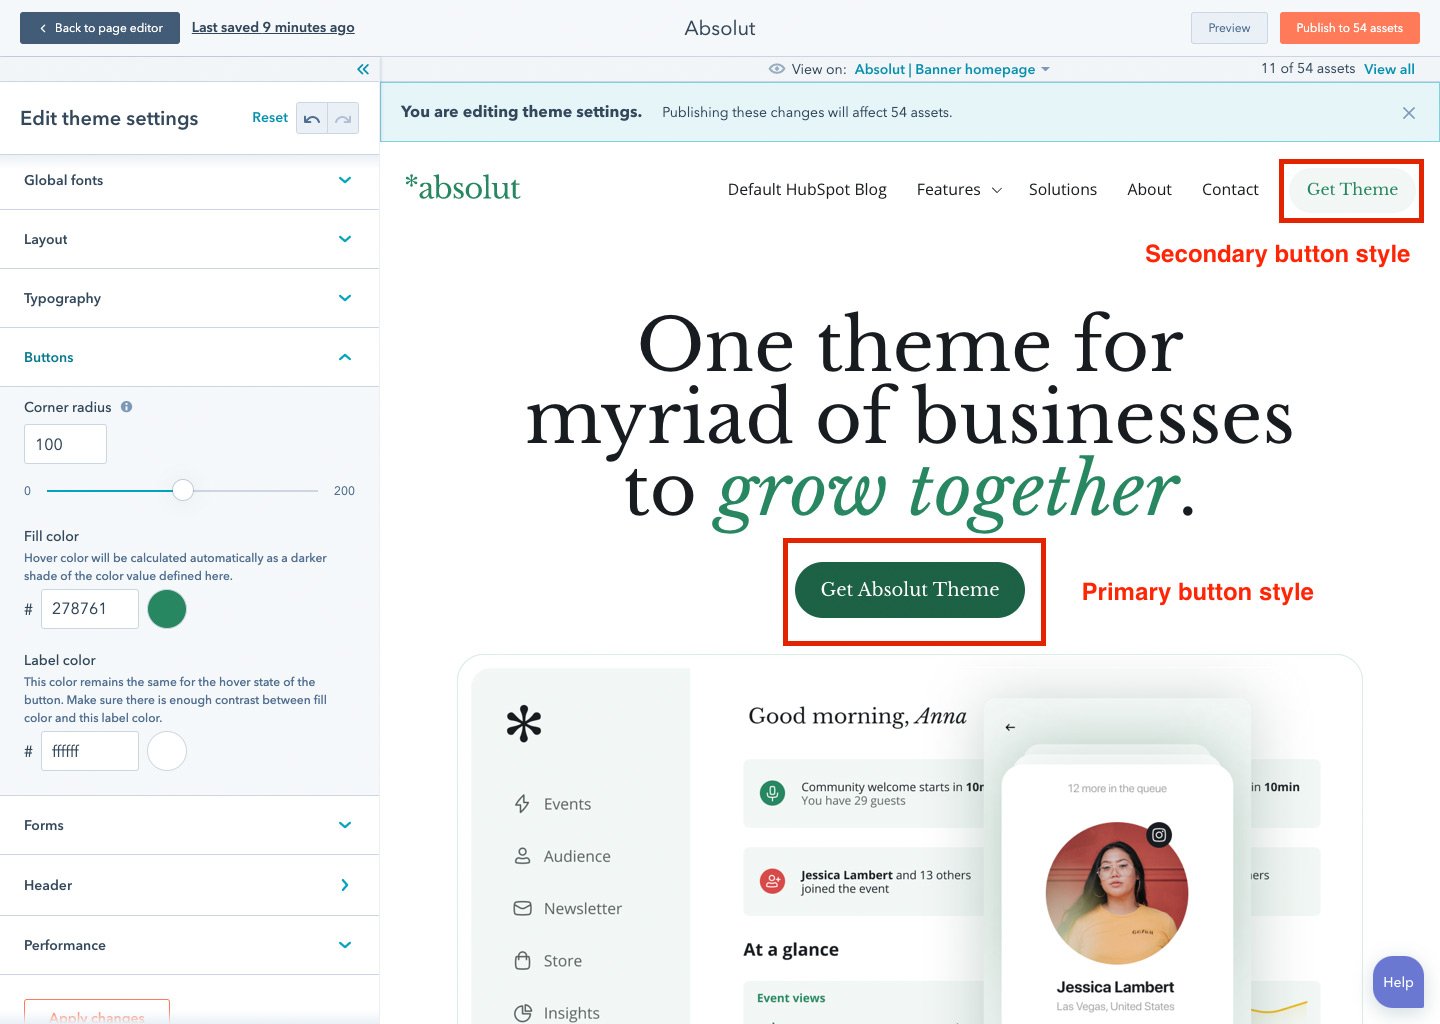
Hover colors are generated automatically based on the background color. Both for Primary and Secondary styles hover color is a darker shade of the normal state background color.
Please go one by one to change all of these, so all your theme buttons are updated site-wide.
Once you are done with the buttons, you will finish customizing all the basics of the Absolut HubSpot theme. However, there are more customization options such as forms, so feel free to keep exploring and customizing as much as you want.
→ Customization: FAQ
How to set up custom fonts?
Absolut theme allows choosing fonts among a huge gallery of Google Fonts. Custom fonts can be added manually by editing the code of the theme. This comes as part of our premium customization services.
Learn more about our services
If you're familiar with HubSpot development, you may follow the instructions from HubSpot itself. It's recommended to host font files in the files tool, then reference them in the stylesheet through CSS.
Please note: custom fonts are only available in accounts with access to the design manager and need to be applied with CSS. Adding a custom font will not add the font to styling dropdown menus in the content editor.
To use a font in content, upload the font's files to the files tool. HubSpot recommends uploading a minimum of the .woff, .ttf, & .eot versions of the font to ensure your font loads on all browsers. You can use the Expert mode on Font Squirrel's converter tool to generate additional file formats.
- In your HubSpot account, navigate to Marketing > Files and Templates > Files.
- Click Upload files.
- On your computer's hard drive, select the font files, then click Open.
- Click the name of an uploaded font file.
- In the right panel, click Copy URL to copy the URL where the file is hosted. You will need the URL for the font in each file format.
Once you've added a custom font to the files tool, you can reference it in a stylesheet. Each font style (italics, bold, etc.) will require a separate @font-face rule.
- In your HubSpot account, navigate to Marketing > Files and Templates > Design Tools.
- In the finder, open the stylesheet used for your content.
- For each font style, at the top of the stylesheet, paste the following code:
@font-face { font-family: 'Your Font Name'; src: url('your_font_file.eot?') format('eot'), url('your_font_file.woff') format('woff'), url('your_font_file.ttf') format('truetype');}
ReplaceYour Font Namewith the name of the font.
Replaceyour_font_file.xxx?with the URL from the files tool. Repeat for each file format. - Create CSS rules with the font-family property to apply the custom font.
- In the top right, click Update or Publish to take your changes live.
Does Absolut theme support Arabic?
Currently, Absolut theme supports only LTR languages. We also provide premium customizations that might help convert Absolut theme to RTL specifically for your website.
Learn more about our services
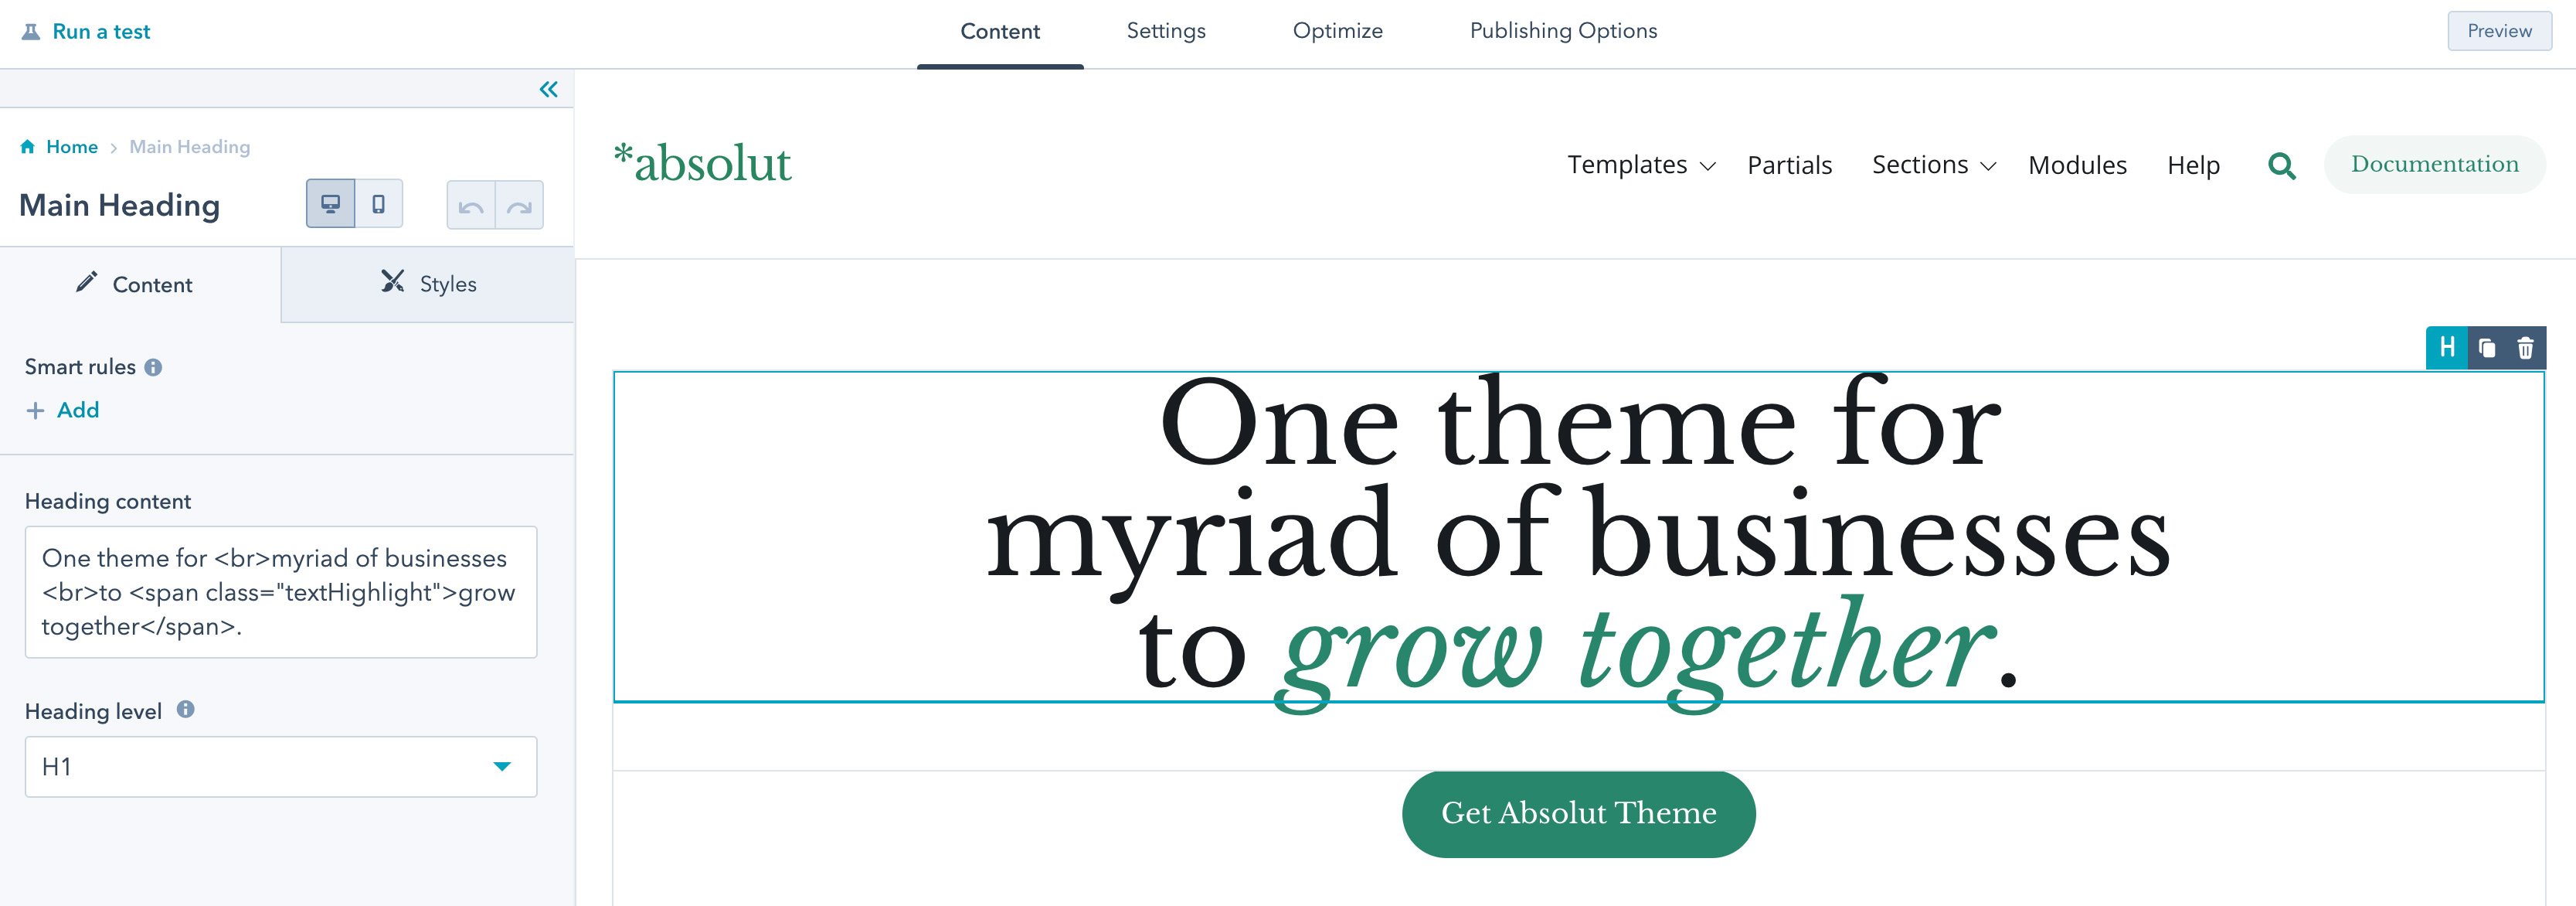
How to highlight a single word in the Absolut heading (H1, H2, H3 etc.)?
To highlight a word inside the heading just wrap the word with a span tag with a class class='textHighlight'.
Header
The header as one of the most important parts of the website has global settings stored in two places — theme settings and global partial settings.
→ Theme Settings
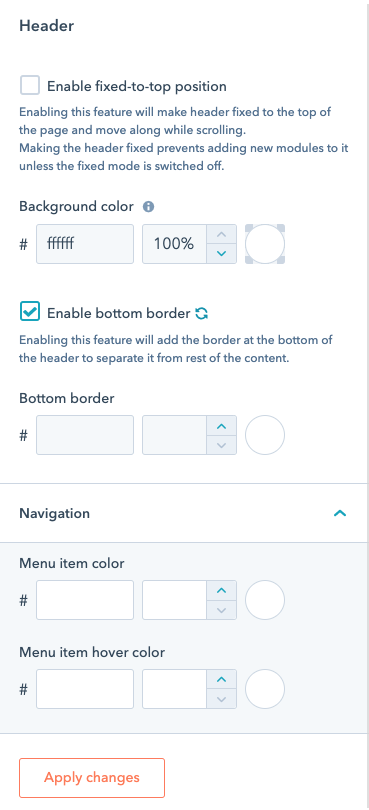
Along with forms, buttons, colors, etc. you can make changes to the website header appearance from the theme settings. It includes:
- animated logo option
- fixed-to-top position
- height
- background color
- bottom border
- navigation item color
- search
Animated logo
By enabling an animated logo option, you switch between two modules in the header — static logo and Lottie-file logo. Nowadays, it's getting increasingly popular to use animation to increase engagement with a brand and website, so you might consider having your logo animated with Lottie-file as an export format (more about Lottie).
Fixed-to-top position
By enabling a fixed-to-top header position, you make the header fixed to the top of the page and make it move along while scrolling. Making the header fixed prevents adding new modules (in global partial settings) to it unless the fixed mode is switched off.
Height
This value impacts the top spacing of the main content when the header is fixed-to-top and on the mobile layout. It's recommended to edit this value when you feel the logo or other elements require more vertical space in the header.
Search
By enabling seach, you add a search icon to the main navigation right next the menu items on the descktop. Search icon triggers the modal with the search field that takes the full screen.
Colors and sizes for the search in the theme settings impacts all the search icons — a trigger icon and icons inside the modal.
To change the styling of the search input field, go to the Form settings in the theme settings. Bare in mind that those are the global settings that impact all the forms in the theme, including the search form.
→ Global Partial
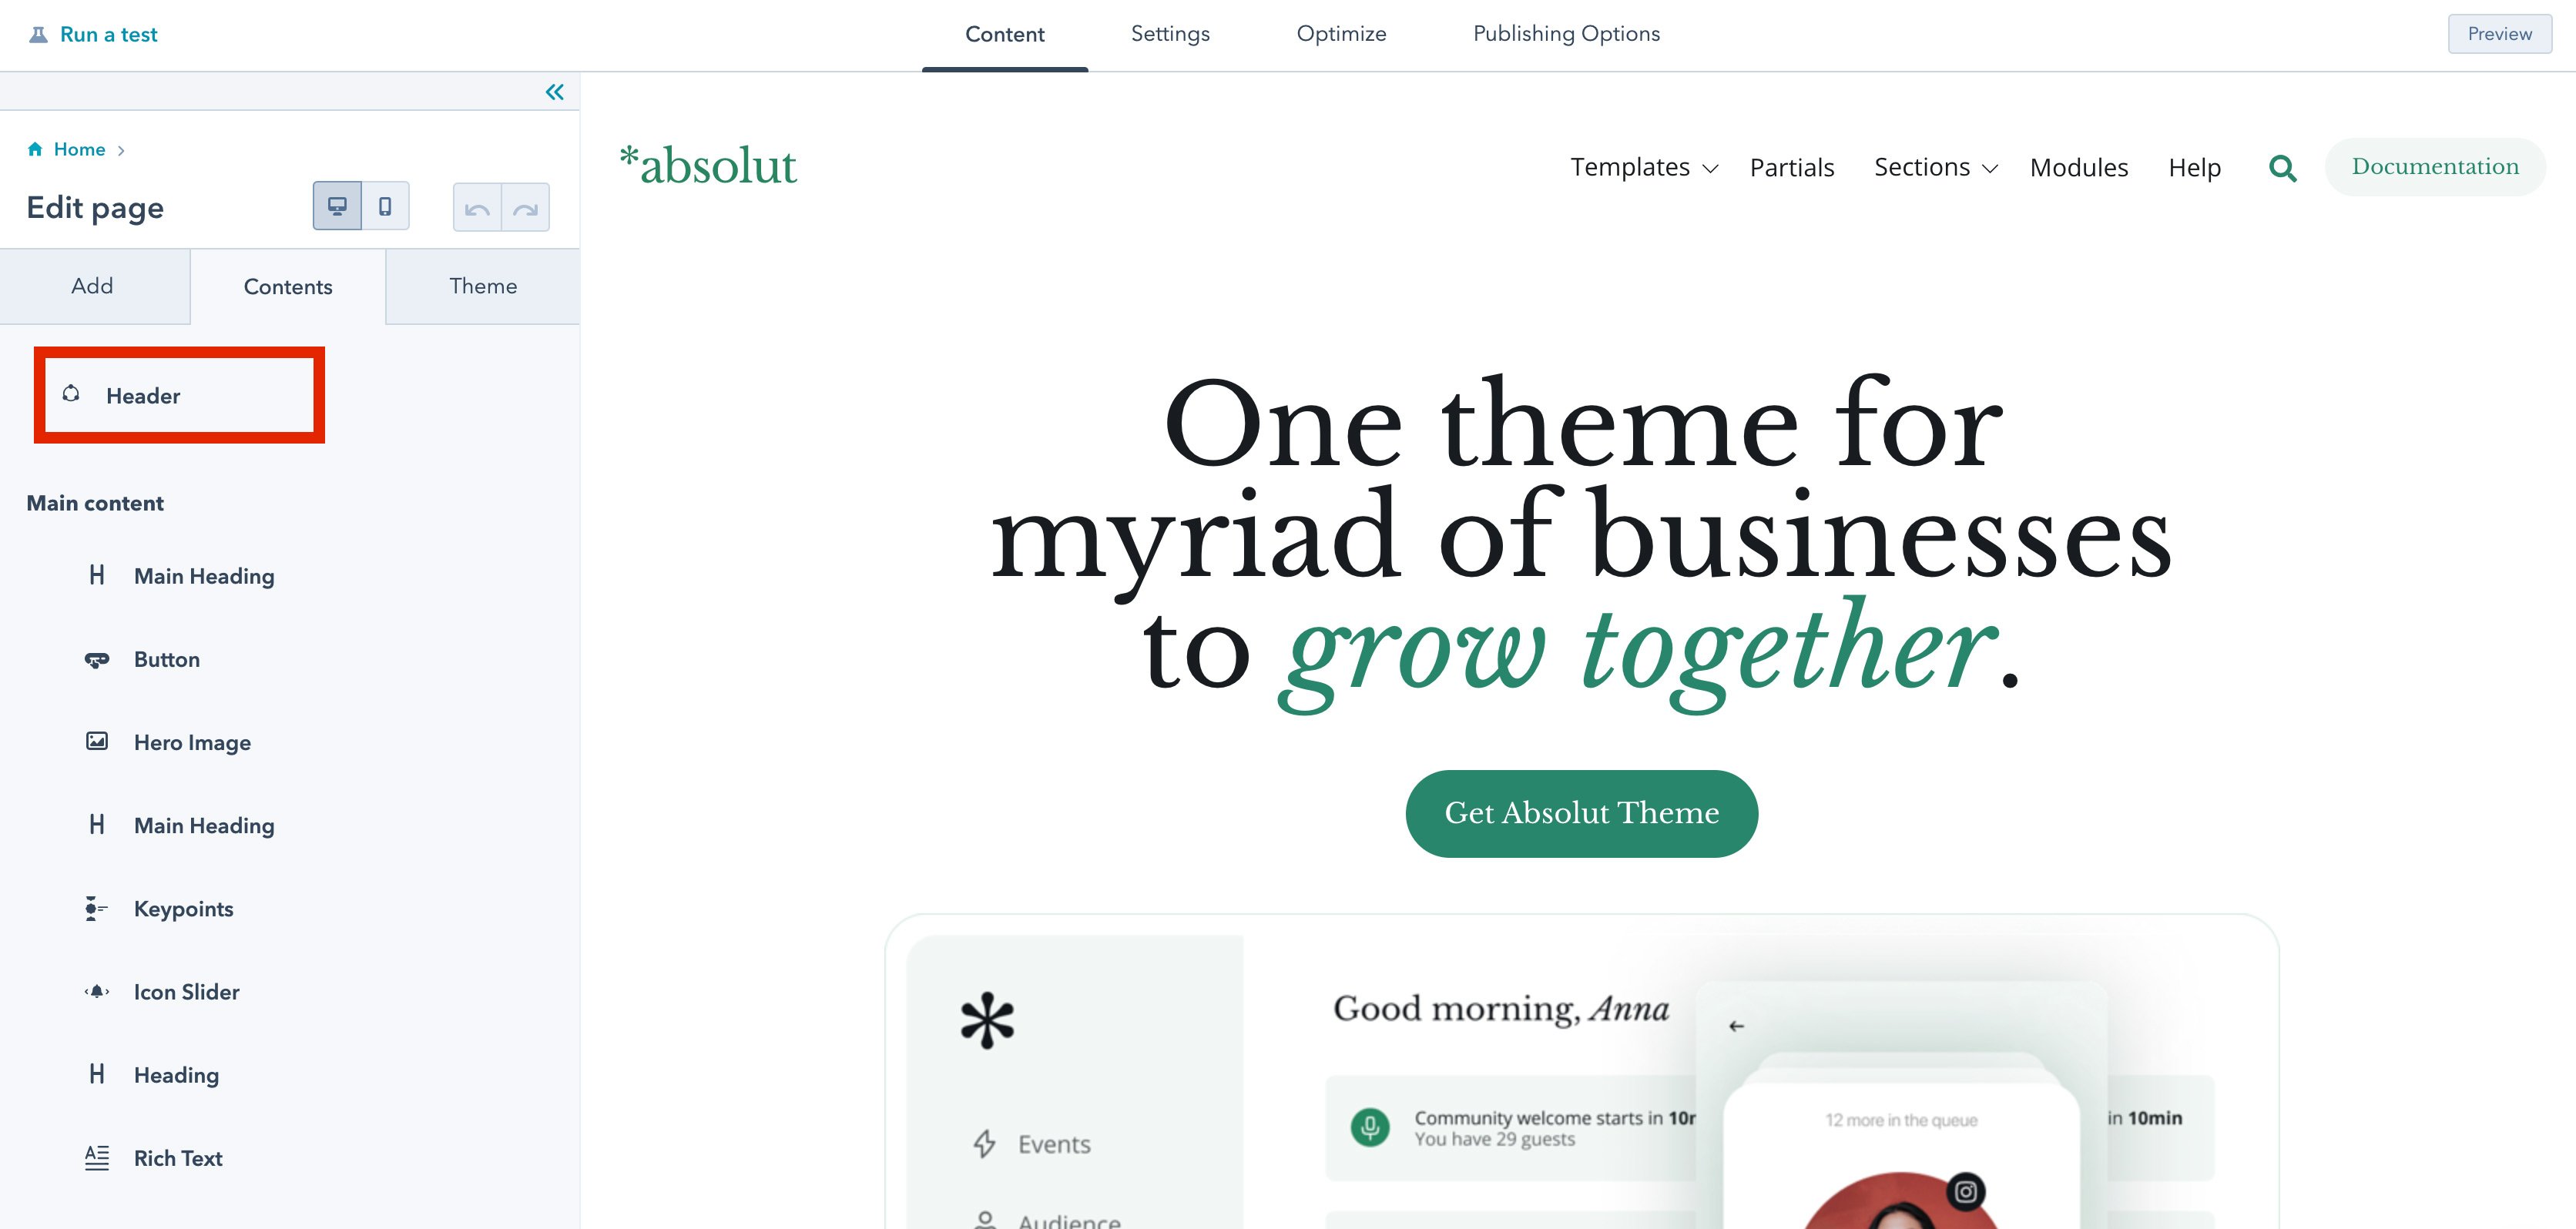
Another place to edit the header is inside global partial settings. To edit the header's content, open any page of Absolut theme in
Marketing > Website > Website Pages.
Then in the Content tab, click Header to open global header settings.
The system will show a pop-up to warn about editing global content. In this pop-up, click Open in the global content editor.
Now you have access to the header content:
- logo
- mega menu
- actions
- search
- language switcher
Once Absolut header is set to fixed-to-top in the theme settings, it allows adding additional modules on top of the main content as easy as drag-and-drop. Having drag-and-drop functionality in the header provides freedom of expanding header content with prebuilt modules or your custom ones. For example, creating a notification banner might be the perfect case.
Logo
There are two different logo variants — static and animated.
Static logo. It's a default type of logo module content. Here, you can upload an image that will be a global logo for all pages or override the default logo on this exact page you opened header settings.
![]()
We recommend you upload the logo in SVG format (Scalable Vector Graphics) as it will be super light and look perfectly sharp on every device. However, if you don’t have a vector version of your logo, a PNG or JPG will work great too.
Animated logo. This option is valid when it's turned on in the theme settings of the theme. If the checkbox is ticked, here in the global partial, you'll be able to add a logo as a Lottie-file (more about Lottie format).
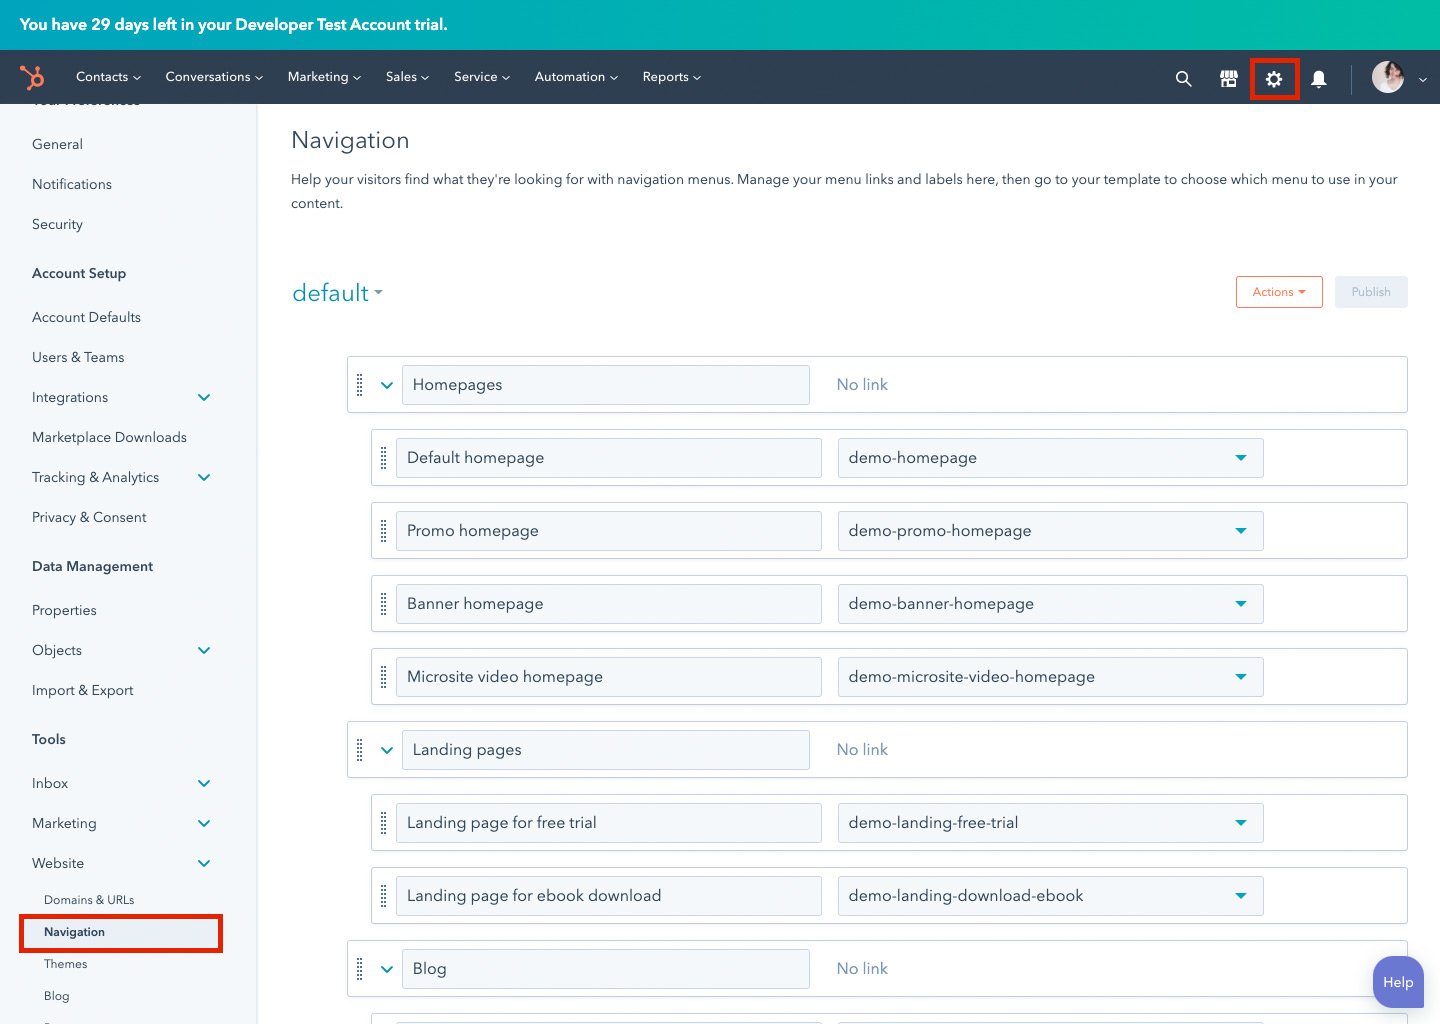
Mega menu
Mega menu module has two main settings — setting a menu from the websit navigation list and creating a megamenu items for a specific menu item.
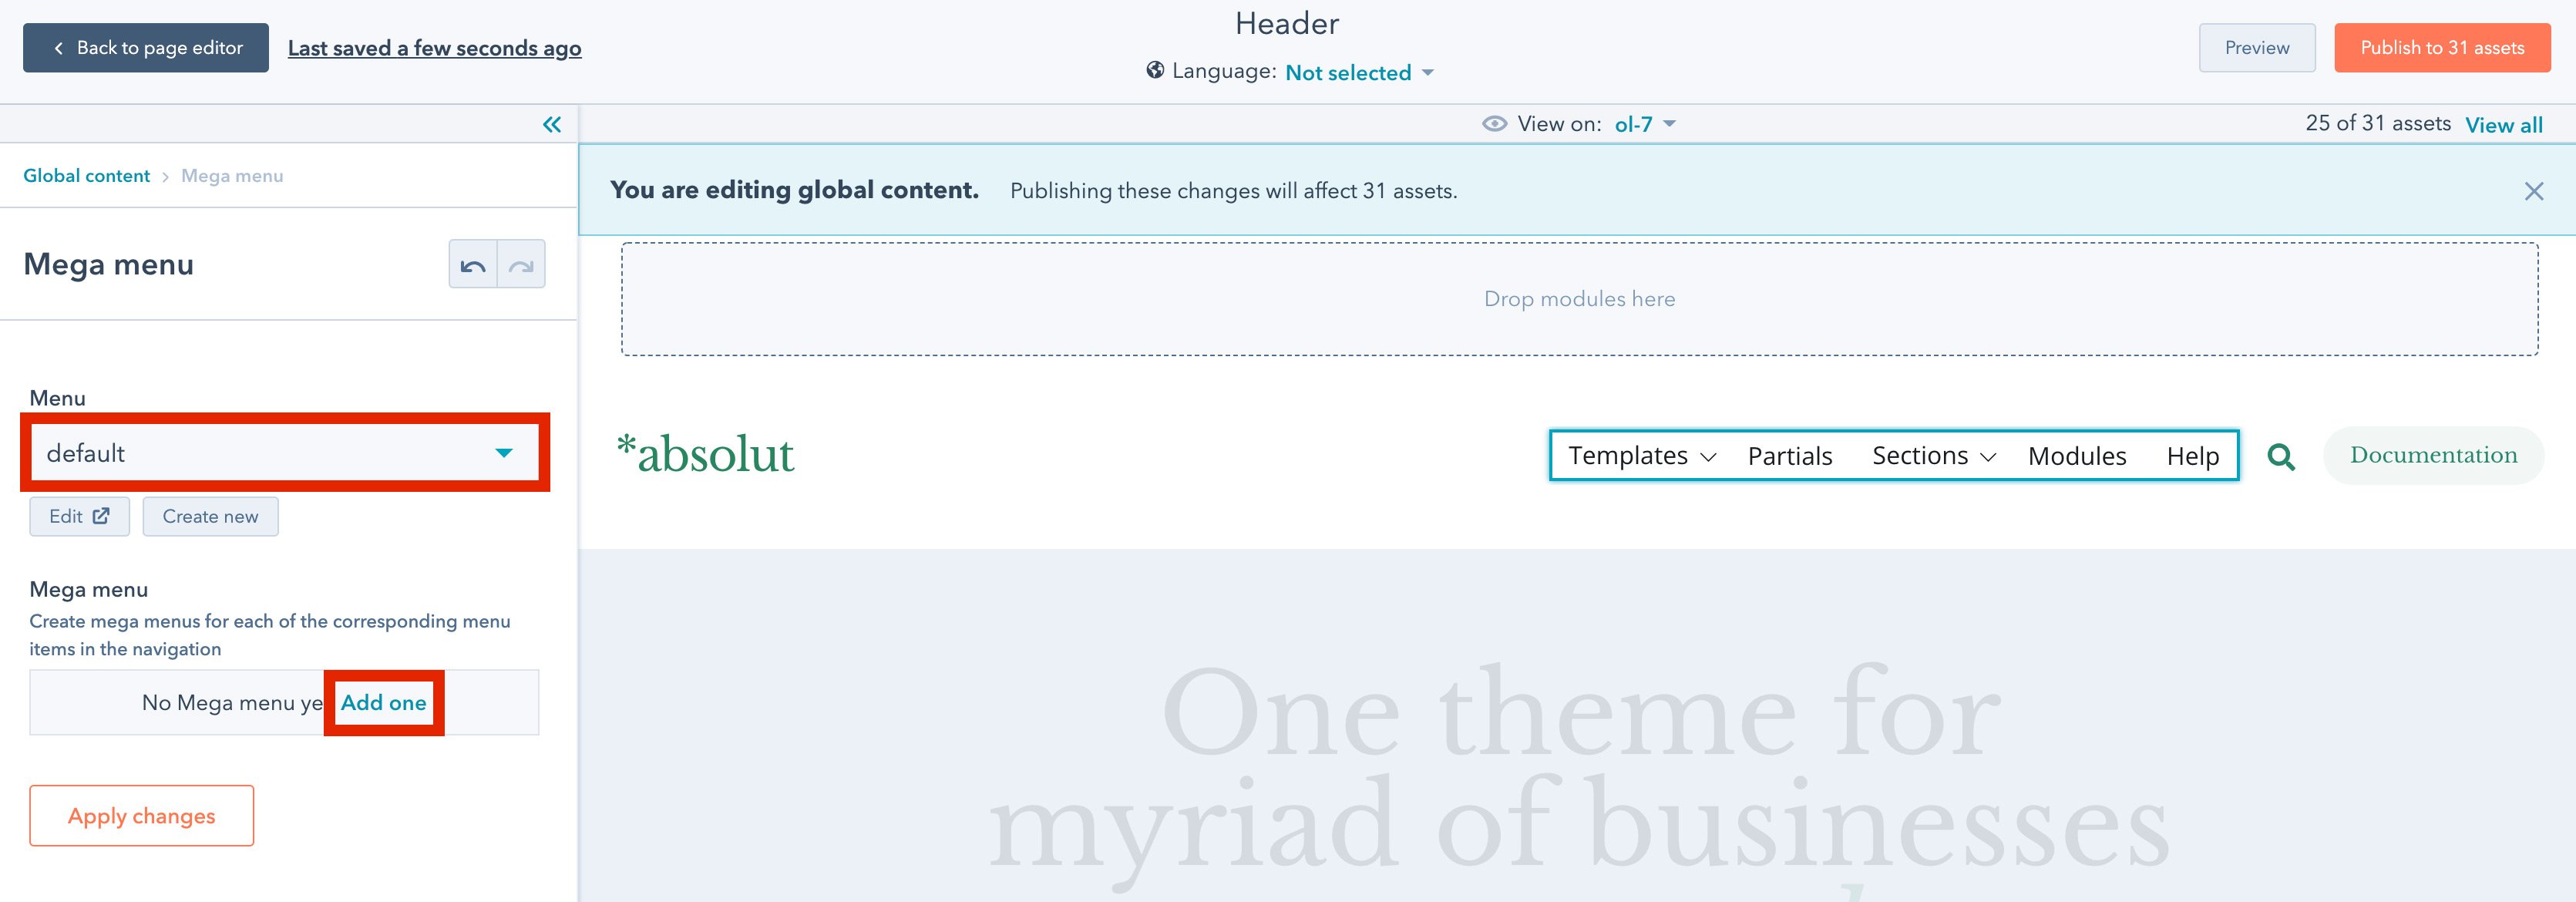
First, you choose an existing menu from the list or create a new one. Creating and editing menus are managed in
Settings > Website > Navigation.
Then, if necessary, create a megamenu. To start the process click on the Add one to open an editing panel. Then:
-
Type in a Menu parent label.
It's essential to type in a menu item label that will have a mega menu precisely as it is in the main menu. For example, if you have a main menu item called "Solutions", which is going to have subitems displayed as a mega menu. So in the field Menu parent label, type in "Solutions". The field is case sensitive, so "Solutions" and "solutions" will be treated as different entities. - In the Mega menu items, click Add one to open an editing panel for each megamenu item.
- In the new panel, edit the title, description, link, and image. It's important to fill in all the fields to have a nice and properly aligned layout of the megamenu.
- To see the changes click Apply changes and click Preview.
Actions
Actions module allows adding buttons to the header. The number of buttons are not limited. However, design-wise the optimal numbeer is two buttons. It's also possible to have only one or delete all the buttons in the header.
To delete a button from the stack, hover over the required button and click the delete button. Another option is just to delete the label of the specific button in the text field, and this button won't be displayed in the header.
It's important to click Apply changes to save the editting.
Search
Search settings are all the default HubSpot options that allows edit labels and search results.
Language switcher
Language switcher has one setting, which is a display mode. Also, it's good to remember that the switcher only displays once multiple languages are turned on in the HubSpot account. More about multiple languages in HubSpot documentation.

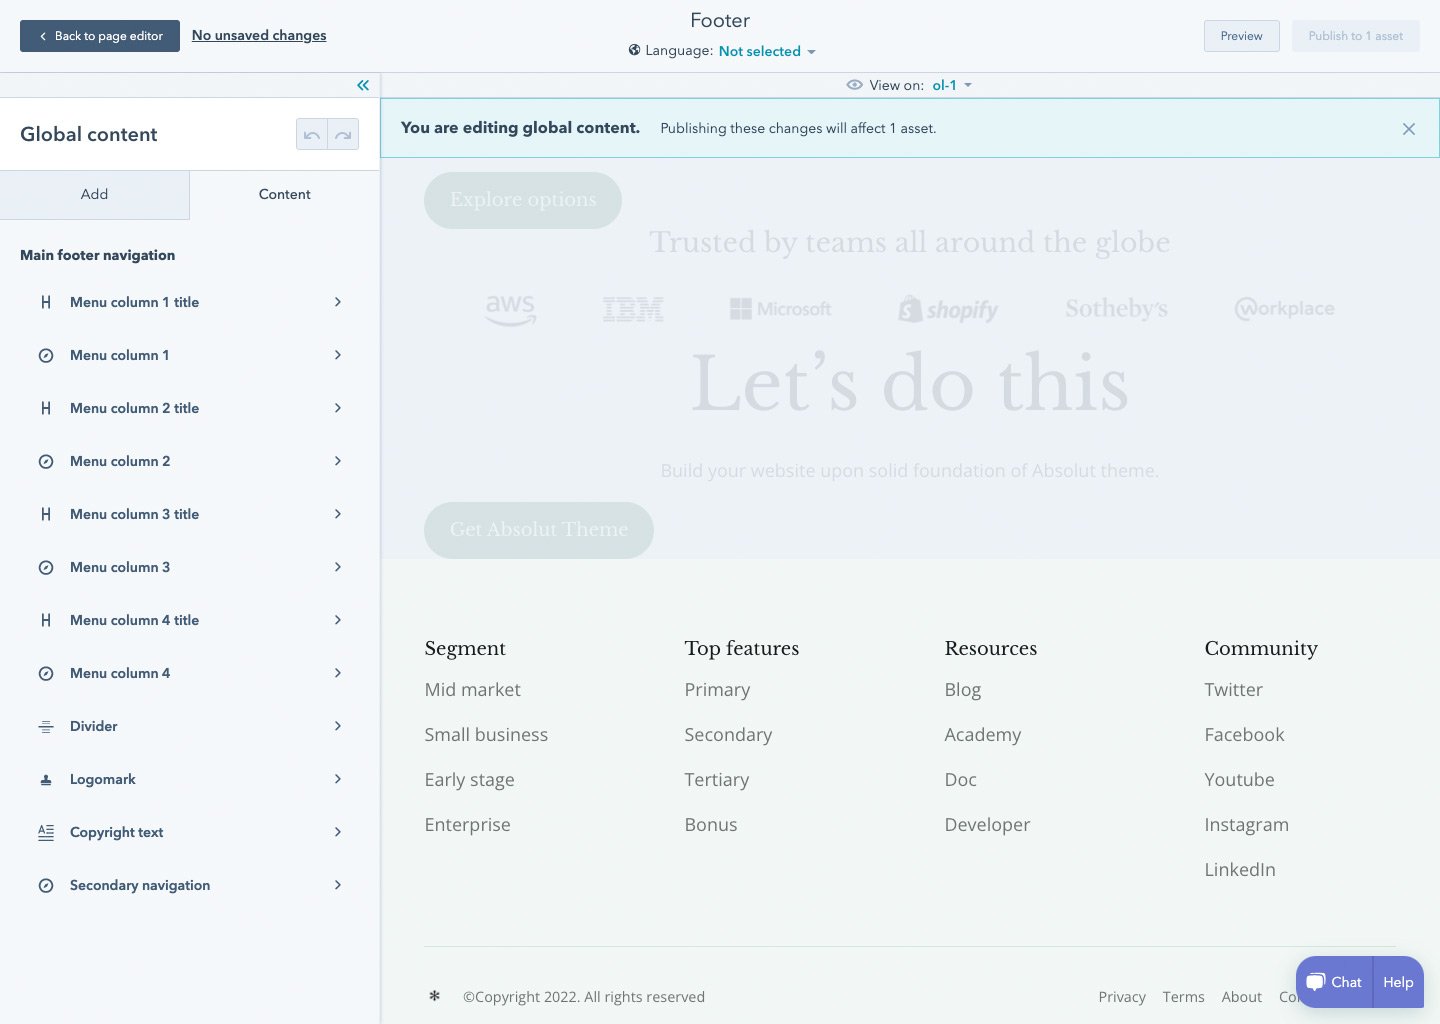
Footer
For the footer, the story is pretty much the same as the one in the Header. In order to edit the Global Footer section, you just need to edit any Website page, scroll to the bottom, and you will find the footer.
Just click Footer, and you will be redirected to the screen to start editing the footer. Absolut footer is drag-and-drop, so you can adjust columns, delete or add modules similar to how you edit the main content of the page inside HubSpot.
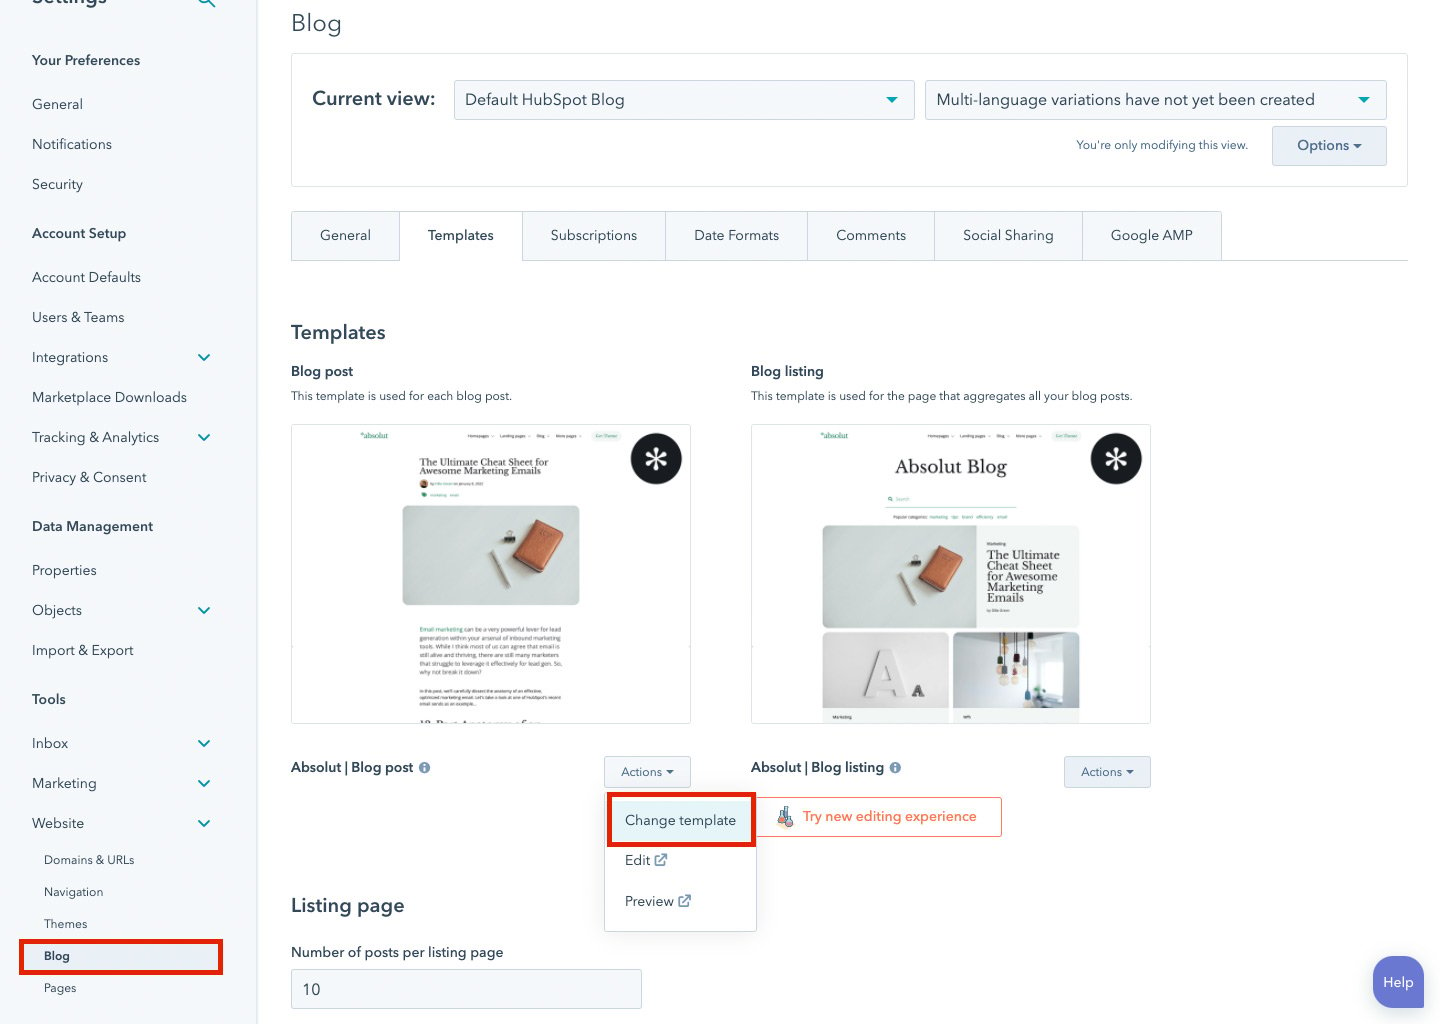
Blog
One of the pillars of inbound marketing is a blog. Let's match your blog to the rest of the pages using the Absolut theme.
To choose the Blog Listing and Blog Post template, you just need to go to Settings > Website > Blog > Templates.
Then, click on Actions to choose Change template. The next screens will guide you to choose a theme and its blog templates. Pick Absolut and its corresponding templates. Click Save button that shows up at the bottom after templates are chosen.
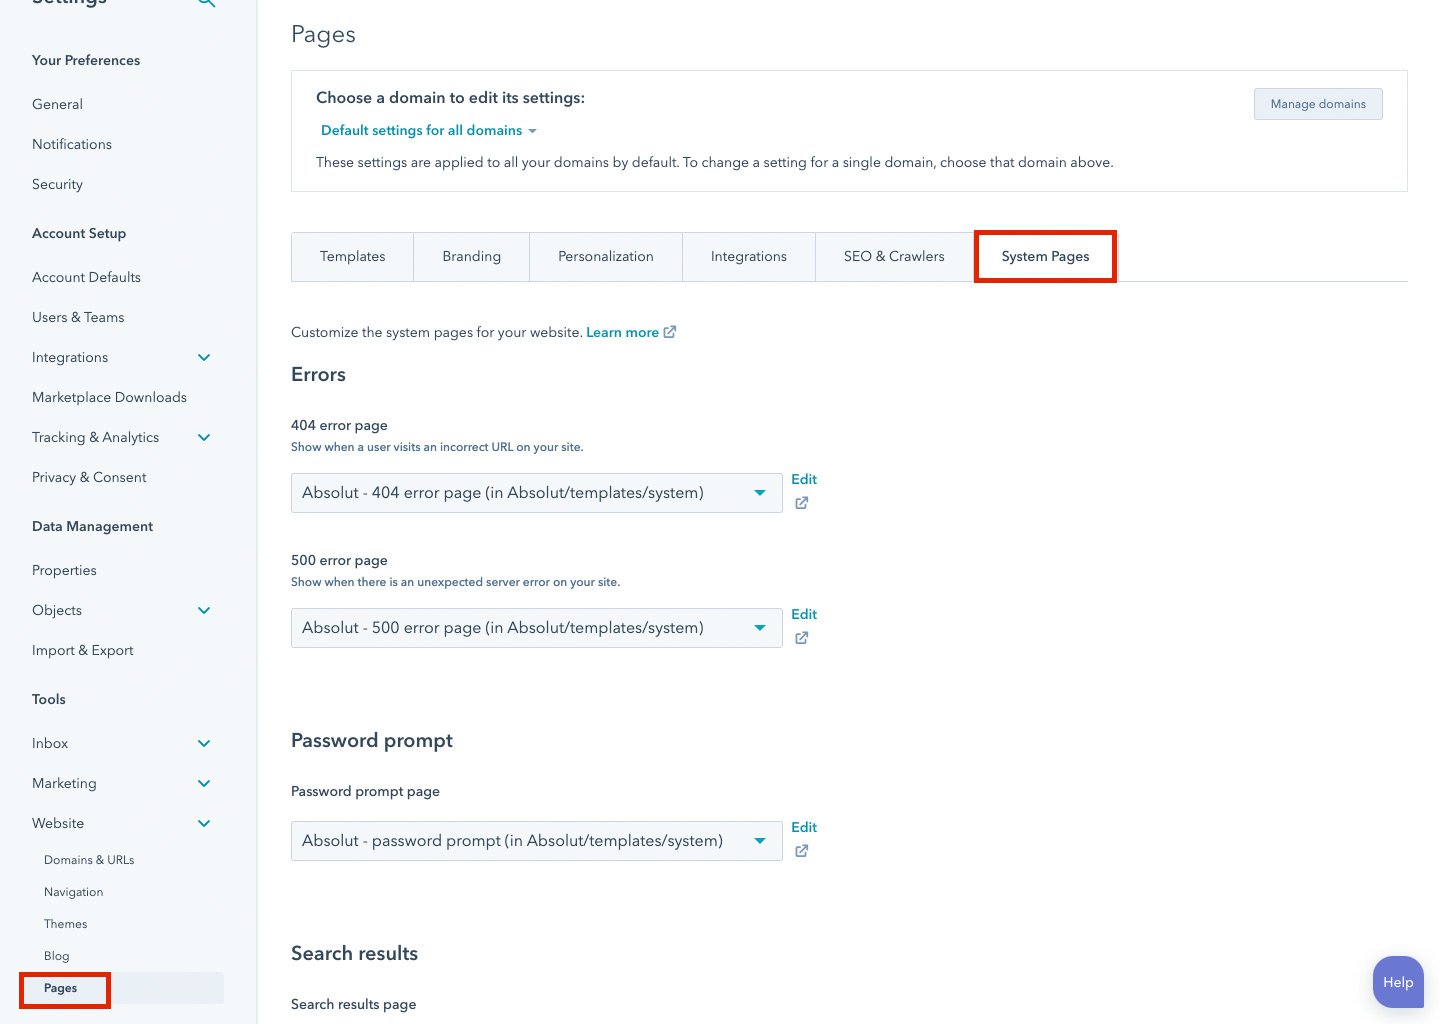
System Pages
There is a bunch of system pages that are important for user experience and Absolut also has them. To update default HubSpot templates or your current ones for system pages go to Settings > Website > Pages. Then, open System Pages tab.
Below is a list of pages to update:
- 404 error page
- 500 error page
- Password prompt page
- Search results page
Modules
Absolut HubSpot theme includes 30 custom-made modules:
- Accordion
- Animated text
- Animation
- Boxed image
- Button
- Button stack | added in Version 3
- Card
- Collapsed text
- Event card
- Features
- Icon slider
- Image loop
- Image mask
- Image stack
- Info slider
- Keypoints
- Logo
- Map | added in Version 3
- Mega menu | added in Version 3
- Person card
- Person video
- Pricing card
- Social follow
- Table of content | added in Version 3
- Tabs
- Testimonial v1
- Testimonial v2
- Thumbnail
- Typing text
- Video background
Any additional module comes as a premium service.
Learn more about our services
Sections
Absolut HubSpot theme includes 31 reusable drag-and-drop sections, which are assembled from custom modules and default HubSpot modules.
- Call to action
- Call to action (centered)
- Capabilities
- Cards
- Duo-box
- Duo-box (image only)
- Feature with cards layout
- Feature with video module
- Feature with visuals
- Feature with visuals (reversed)
- Feature with visuals and button
- Featured thumbnails
- Frequently asked questions
- Hero animated text
- Hero banner
- Hero featuring product
- Hero featuring product (centered)
- Hero with form (centered)
- Hero with form two-column
- Hero with video module
- Intro
- Intro with lottie animation
- Keypoints
- Multi-column content
- Options
- Pricing
- Quote
- Side-by-side
- Social proof
- Team
- Testimonial
Templates
Absolut HubSpot theme includes 15 page templates:
- About
- Banner homepage
- Blank page
- Blank with sidebar template | added in Version 3
- Contact
- Default homepage
- Events
- Landing page (download assets)
- Landing page (get free trial)
- Long-read page | added in Version 3
- Pricing
- Product
- Promo homepage
- Resources
- Video homepage
2 blog templates:
- Blog index
- Blog post
7 system templates:
- 404 error
- 500 error
- Backup unsubscribe
- Password prompt
- Search results
- Subscription confirmation
- Subscription preferences
Any additional templates comes as a premium service.
Learn more about our services
Support
Absolut HubSpot theme is a free theme with no support included.
However, we offer premium support services to help with any customization needed above the core theme functionality. Feel free to send us an email at support@kohorta.co — either Olia or Roman will contact you back.
Learn more about our services